This detailed guide will walk you through how to stake your KSM in minutes. It’s organized into 2 segments.
- Set up your wallet — you’ll need a Stash account and a Controller account
- Set up staking — choosing your staking options and nominating validators
1 — Set up your wallet
In order to stake KSM, you’ll need to set up 2 wallets: 1 stash account+ 1 controller account.
Your stash wallet will hold 99% of your KSM to be staked. Your controller wallet should hold between 0.1–0.3 KSM to handle transaction fees. Transaction fees run between 30 uKSM (micro KSM) to 200 uKSM. A 30 uKSM fee is equivalent to 0.00003 KSM
- First go to the Polkadot.js official site for Kusama: https://polkadot.js.org/apps/?rpc=wss%3A%2F%2Fkusama-rpc.polkadot.io#/
- To create a stash account, click on the Accounts tab and then Accounts menu item. There are 3 steps to this.

3. On the Accounts screen, first click on the “+ Add account” button to start step 1.
4. On this screen (step 1/3), a mnemonic seed phrase has been automatically generated. Make sure to save your mnemonic seed phrase in a safe place. If you ever lose access to your account or need to set up access on another computer, you’ll need this mnemonic phrase. Never share your seed phrase with anyone, including us.
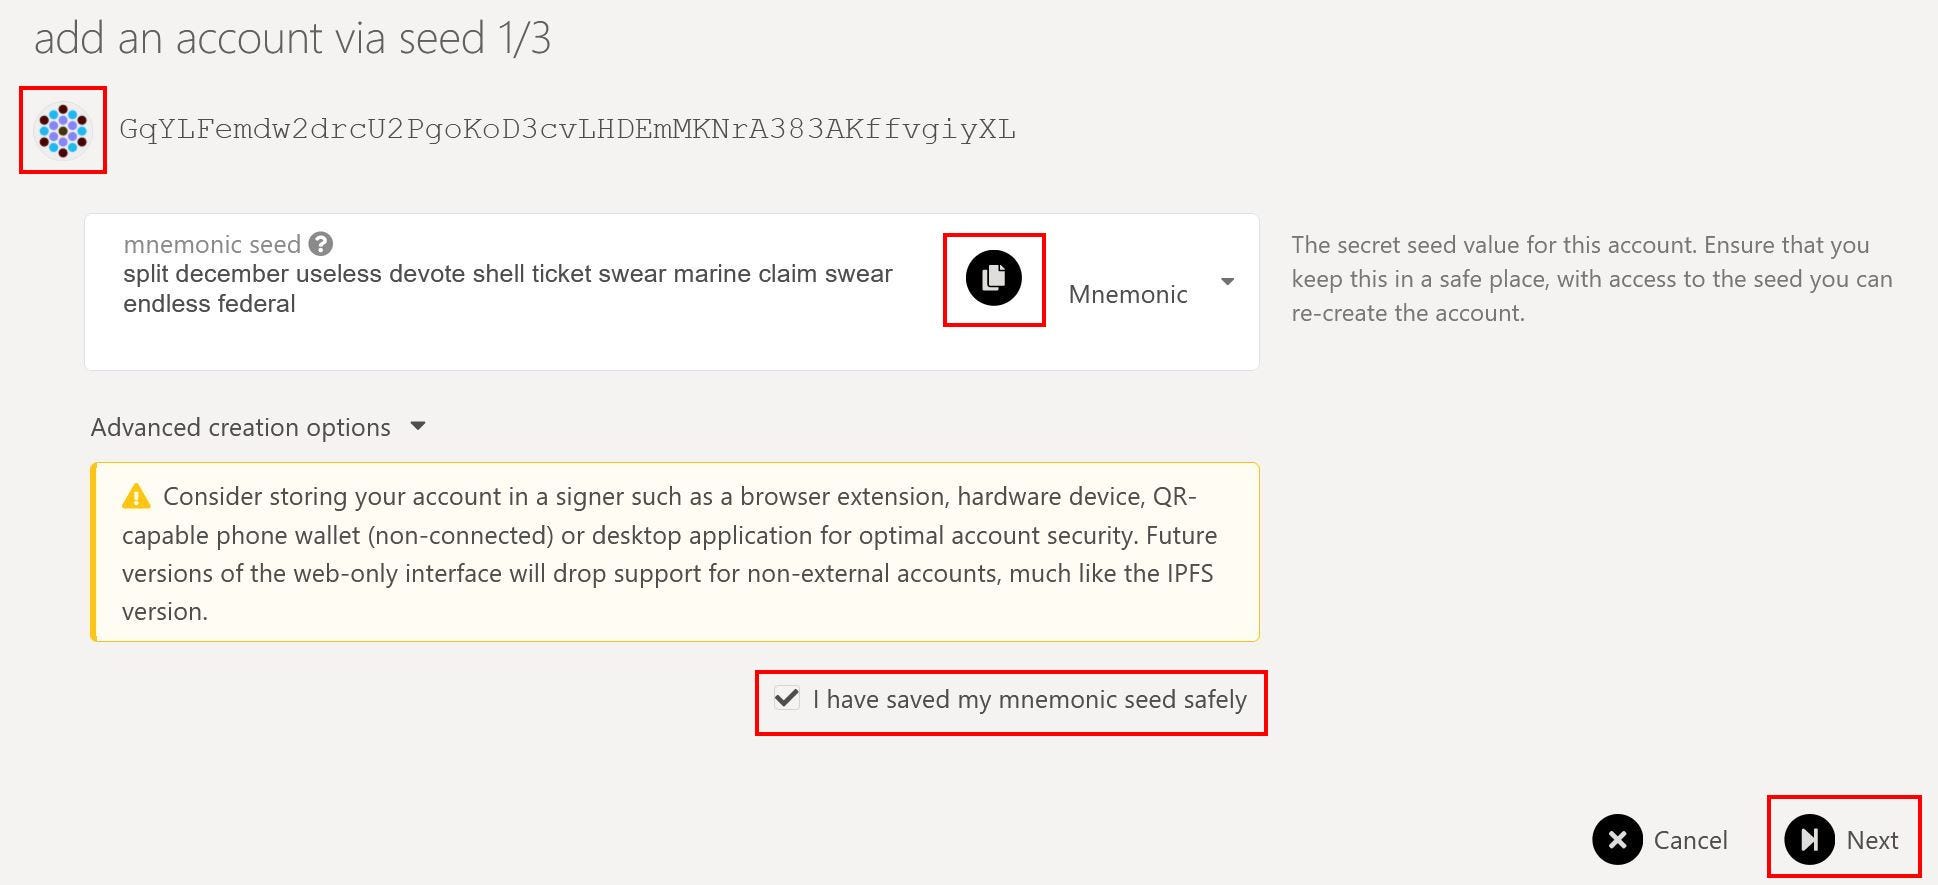
5. Leave all other Advanced options as is using default settings. You can click on the polkadot icon next to your address to copy it and save it along with your mnemonic seed phrase.
6. Once you’ve saved your seed phrase, check the box “I have saved my mnemonic seed safely” to enable the Next button. Click Next to go to step 2.
7. On screen 2 (step 2/3), give your account a name, for example MY STASH.
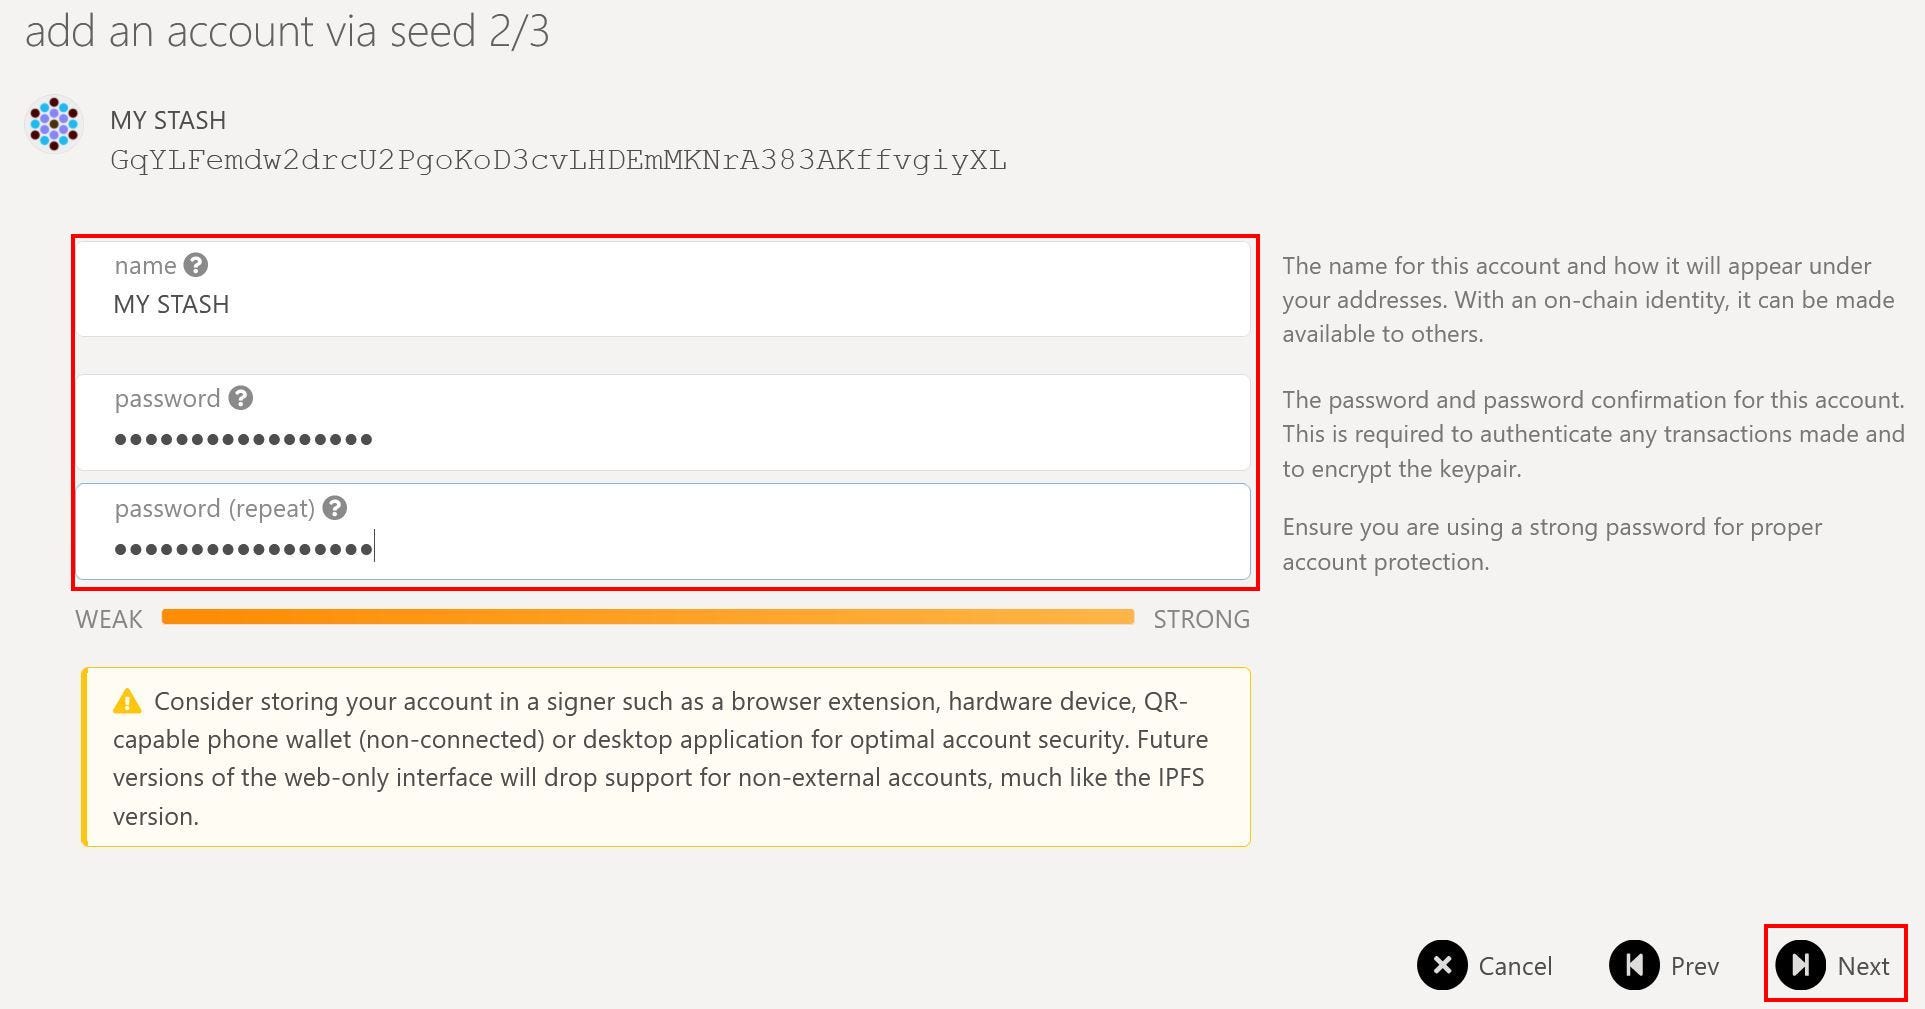
8. Give your account a password and re-enter it again. Be sure to give it a strong password. Click Next button when you are done to go to the last step.
9. On screen 3, verify your seed phrase and click “+Save” button to create your new account. If you haven’t saved your mnemonic seed phrase by now, make sure you have done so.

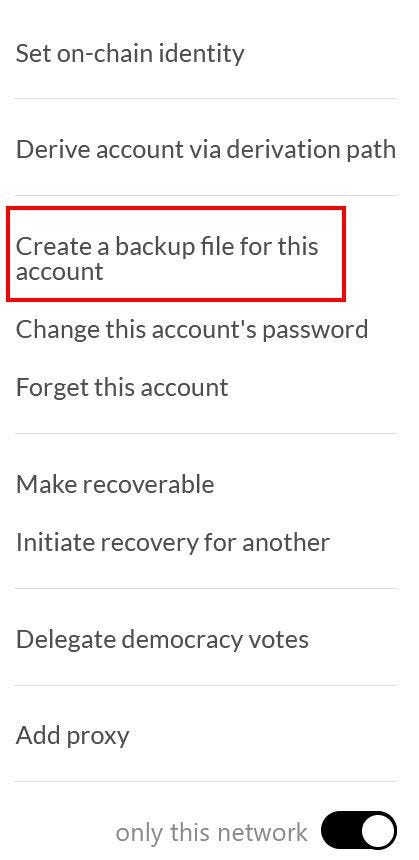
10. Once your account is created, a JSON backup file is also automatically saved to your Download folder. Save this backup file in a safe place. You can use the combination of this backup file and your password created above to restore your account across different browser and wallets without the need to use your mnemonic seed phrase. If you didn’t save this backup file at this step, you can always regenerate the backup file again from the Accounts page.
11. Repeat steps 2–10 above again to create a 2nd account to use as your Controller account. You’ll need both a Stash and Controller account to go to the next segment, 2 — Setup Staking.
2 — Setup Staking
After you’ve set up your 2 accounts above, 1 Stash + 1 Controller account, you can deposit funds into your wallets and start to stake.
Fund allocation
We normally recommend you have 99% of your funds in the Stash account. Depending on how much KSM you have, you can have anywhere between 0.1 to 0.5 KSM in your Controller account to cover for transaction fees. You should also plan to leave about 0.1–0.5 KSM in your Stash account to cover for transaction fees also. For this example, we recommend holding 0.2 KSM in your Controller wallet and keeping open 0.2 KSM in your Stash wallet.
Staking
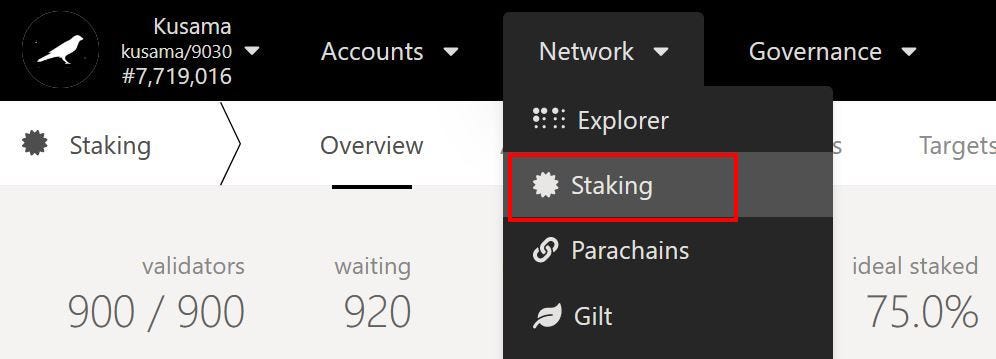
- To start staking, click on the Networks tab and then Staking menu option
2. On the Staking page, select Account Actions

3. On the Account Actions page, click on the “+Nominator” button. This will open up the staking options. There are 2 steps to this.
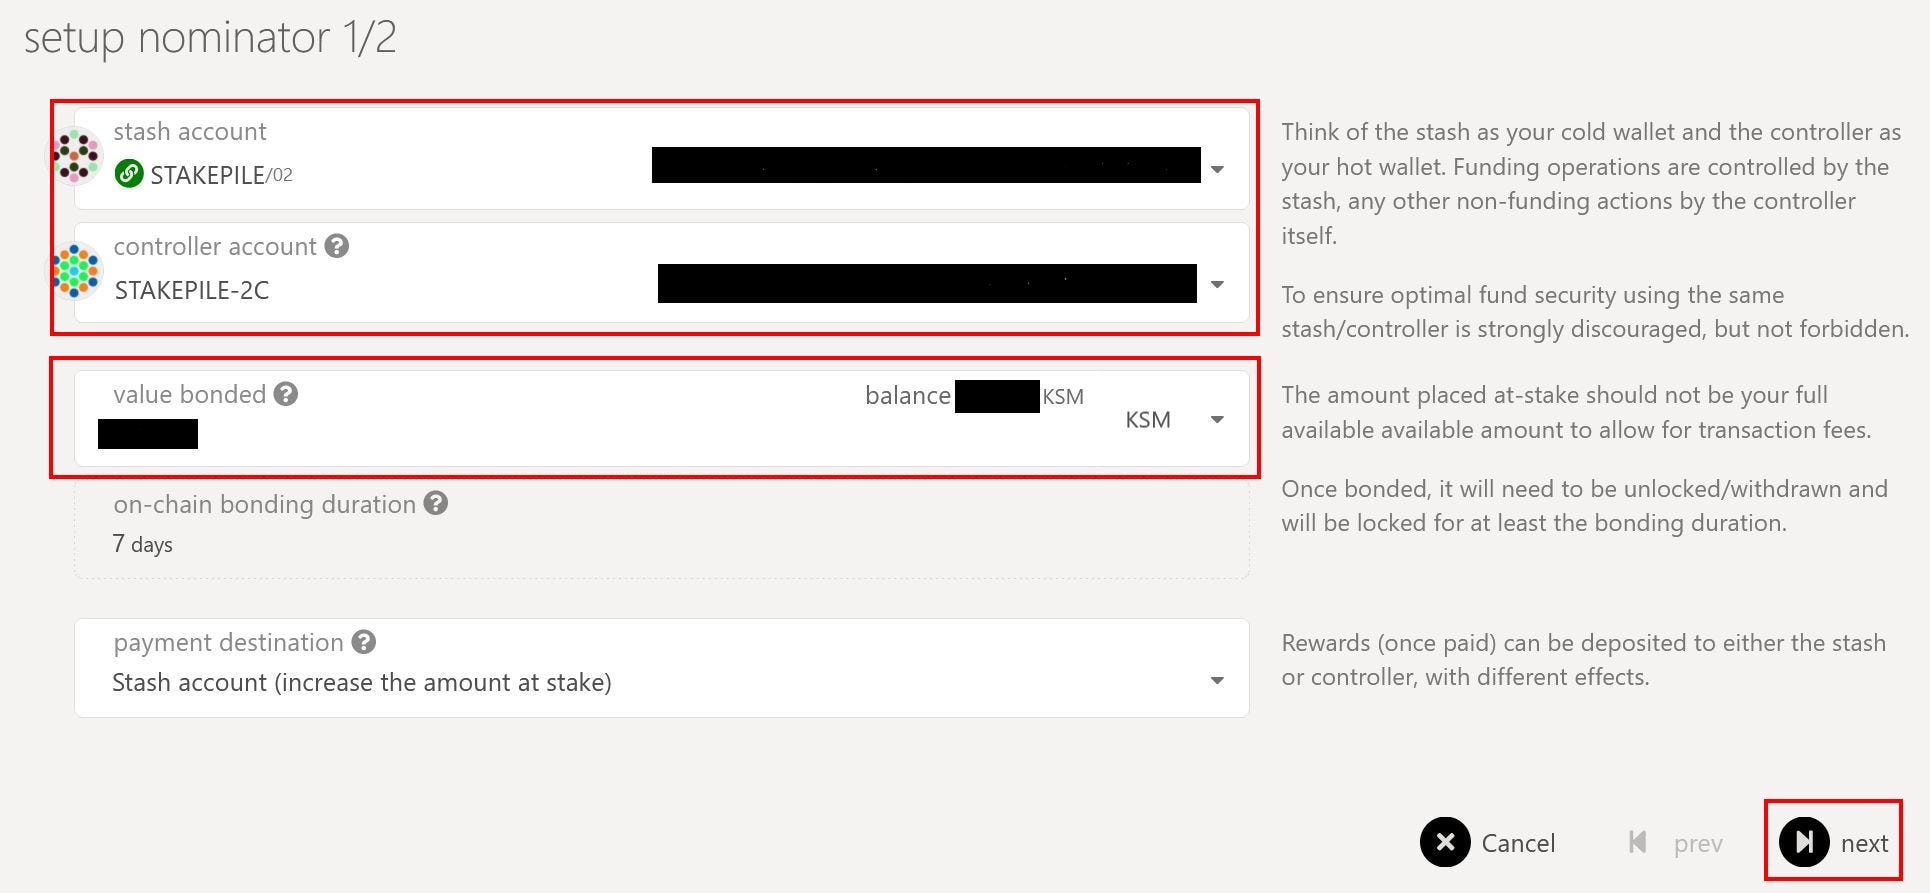
4. In step 1 of 2, select your Stash wallet you created above as your Stash account. This account should have 99% of your staking funds. Also select your Controller wallet as the Controller account.
5. Enter the KSM amount you want to stake in the Value Bonded text box above. Make sure you leave at least 0.1–0.3 KSM un-staked from your total balance. Do NOT bond the entire amount of your Stash account. Otherwise, you will not have enough KSM to cover transaction fees if you need to unbond or do other transactions in the future.
6. We recommend leaving the default option “Stash account (increase the amount at stake)” as is to compound your earnings.
7. Click Next to go to the last step.
8. On the next screen (step 2/2), you’ll be selecting the validators you want to stake with.
9. Enter “STAKEPILE” into the search box to find our validators and click on it to add it to your list of validators. It should appear on the right box (nominated accounts) once you’ve clicked on STAKEPILE like below.
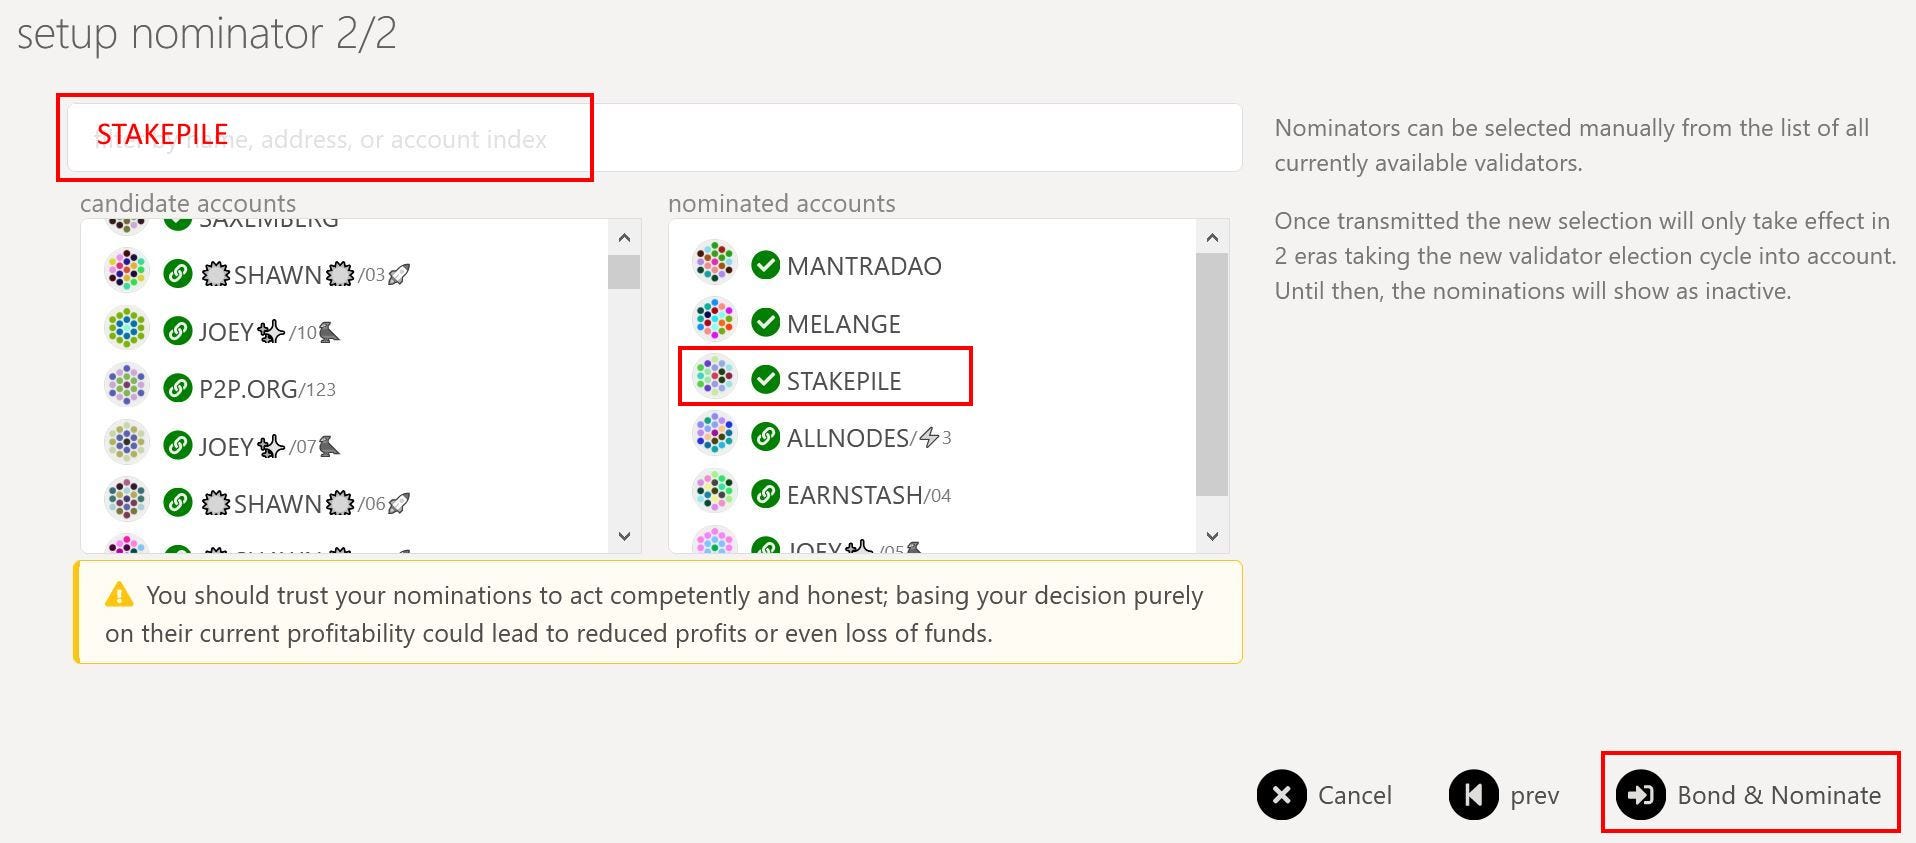
10. You can select up to 24 validators to handle your staking. We recommend selecting between 16–24 validators to ensure you have a good list of validators to rotate from. You can add us and some of the other validators listed above. These validators have low commission and consistently high earnings.
For reference, our validator addresses are listed below:
STAKEPILE: J6TTn21p46c1XzXAZPVTGuQwBxFG2JfTwRnAFwgcdE2SWdz
STAKEPILE/02 : EAChfSL6tQfjy7vD8YgYB8DCn7A9c1aAsERP9Hx8cj1tqxL
STAKEPILE/03 : Era99D7s7gBLVjou1yRUvzRG1bZZJezfnSimtpcs8v3eZfS
11. Once you’ve selected a good list, click “Bond & Nominate” to complete the process.
12. On this last step, you’ll enter in your Stash account password and click Sign and Submit to finish. You can leave all other options as default. Notice the transaction fee of 131.9987 micro KSM. This is equivalent to 0.000132 KSM.

13. Once you’ve clicked Sign & Submit, you’ve completed setting up your staking. Note that it’ll take 1 era (6 hours) AFTER you’ve done these steps for your stake to start earning interest. Immediately after you’ve done these steps, your validator list will show all of them as Inactive validators. This is normal. Check back after 6 hours to see your Stash account staking.